Sheet Tools - Create data links and tables
Last updated: 2026-01-06
Overview
Civil 3D contains a mechanism to link an Excel table to an AutoCAD table in Civil 3D: Data Links. Data links link either an Excel named range, or a range of cells and converts that Excel table to an AutoCAD table, which can be placed in Civil 3D model space or paper space.
This tool automates the data link creation process by utilizing the Excel workbook named ranges and then also can automate the creation of the AutoCAD tables. This is useful for Miscellaneous quantities sheets , earthwork quantities sheets, or any other Excel table that needs to be displayed in a WisDOT plan sheet.
Unlike other workflows, data links and AutoCAD tables result in searchable text in the final PDF plan.
Using the tool
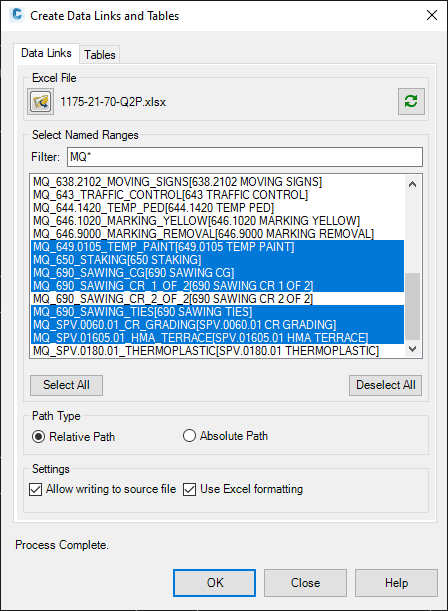
Prerequisite: The Excel File containing the source tables must have named ranges for each table that will become a table in Civil 3D.
WisDOT Sheets Tab > Sheet Creation Panel > Sheet Tools > Create Data Links and Tables
or Command Line DOTCreateDataLinksAndTables
-
Data Links Tab
-
 to select the Excel File containing the tables to be inserted.
- The named ranges list will populate with all named ranges within the Excel File.
- Use Filter to filter the named ranges if desired
- For Example DL*
- From the list, select all named ranges to be made into a data link. One data link is required for each table that will be created in Civil 3D.
- Use Control-Select and/or Shift-Select to select the named ranges desired.
- Select All to select all named ranges and Deselect All to deselect all named ranges.
- Path Type: Relative Path should be chosen if the Excel file is within the Civil 3D project
- It is recommended to always store the Excel file within the Civil 3D project
- Settings (Recommended to leave defaults)
- Allow writing to source file: This allows the source Excel file to be directly edited from Civil 3D
- Use Excel Formatting: All formatting established in the Excel file will be displayed in the Civil 3D AutoCAD table
- OK to create the Data Links
-
- Tables Tab
- Once data links are created in the drawing, the Tables tab list will populate with all data links that are available. This tab is used to create the tables in model space.
- Use the Filter to filter or search the list if desired.
- Select which data links to be made into tables in Civil 3D.
- Users have the choice to place one, multiple, or all the tables in one action.
- Table Style: WisDOT Standard is the WisDOT default and should be used. If WisDOT Standard is not shown in list, it can be added on demand. (Manage panel > Add Components menu > Tables)
- OK to place the tables selected from the list.
- If multiple datalinks are placed, the tool will build the tables in one single row
Click a location in model space to place the table(s). With the dialog box open, users can also adjust the location of tables already placed in model space.
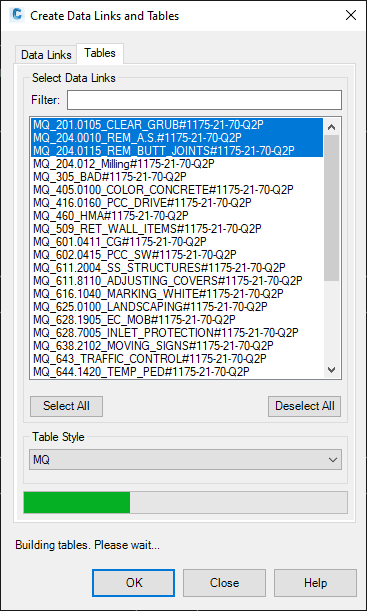
Info:The process of creating tables from data links can be a bit time consuming. While it is possible to create tables from every single data link, it could take considerable time to do so.
Once the tables are created, they will automatically update with any changes made to the original named range in Excel. If the table/named range expands in rows/columns, the table in Civil 3D will also update. Ideally, once a table is created from a named range, that table will no longer need to be created in Civil 3D.