Label assemblies
Total video time: 1:54
Last updated: 2020-10-26
 Label assemblies
Exercise files: rurl-int-creat-cr-asmbly-02-end-data-c3d16.zip
Start with: 12345678\Design\Corridors\Crdr-25-4thAve.dwg
Overview
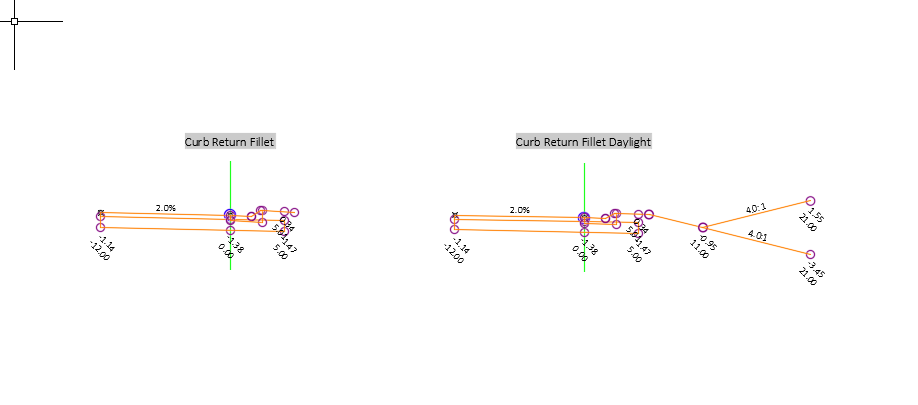
One tool that is not strictly necessary, but can be very helpful is the Label Assemblies tool. The Label Assemblies tool creates pre-filled and pre-formatted Mtext labels containing the name of an assembly. The tool can be used to place a single label at a time or can automatically place labels for all assemblies in the drawing at once.
Using the Label Assemblies tool
WisDOT Civil 3D 2016
WisDOT Design Tab > Assemblies & Subassemblies Panel > Label Assemblies
WisDOT Civil 3D 2018
WisDOT Design Tab > WisDOT Assemblies & Subassemblies Panel > Label Assemblies
It can also be accessed from the command line: SMAT.
To label a single assembly at a time
- Press Enter to accept the current text size as shown in the command line or type a new text size. (0.075 is a good size.)
- Press Enter for single labeling.
- Select an existing label to erase or press Enter to continue to add a new label.
- Select an assembly to label.
- Left-click on the screen to place the label in the desired location.
- Select an existing label to erase or press Enter to continue adding new single labels.
- When you are done adding labels press Enter twice.
- Press Quit or type Q on the command line to exit the Label Assemblies tool.
To label all assemblies in the drawing at once
- Press Enter to accept the current text size as shown in the command line or type a new text size. (0.075 is a good size.)
- Press All or type A on the command line to label all assemblies.