Rural intersection: data management
Total video time: 4:26
Last updated: 2026-01-06
Exercise files: rurl-int-begin-data-c3d16.zip
Start with: 12345678\Design\aliprofs\AliProf-25.dwg
Data management
This will give a brief overview of the project as a whole to get a better understanding of how we are going to structure our project data and why we put certain objects in certain files.
This project is a reconstruction of WIS 25 along with a reconfiguration of some of the intersections. We're going to square up 4th Avenue as best as we can.
At 14th street we will create a T intersection and improve the angle.
At Upper Pine Drive we will create a T intersection and obliterate the stretch of road on the other side rerouting that traffic to 14th Street.
This project will be split among three designers. WisDOT will design the main corridor of WIS 25 and the intersection at 4th Avenue. Two contractors will design the other intersections.
The following diagram shows how we are going to organize the project.
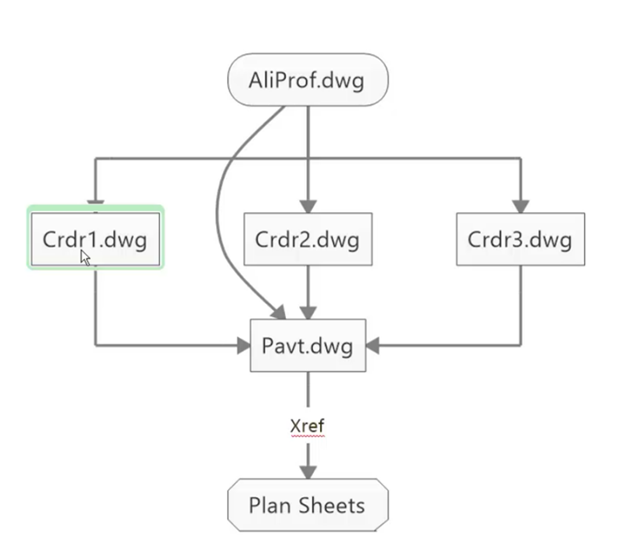
The AliProf file will contain all the information pertaining to the entire project including the mainline alignments for Highway 25- centerline, Edge of travelway, edge of paved shoulder and edge of gravel surface. It will also include a dynamic intersection block for the initial layout and alternative intersection designs.
The corridor drawings will contain objects that are specific to that intersection and are not project wide. The corridor drawing for 4th Avenue will contain the edge line alignments for the turn lanes, the curb return, 4th Ave edge of pavement and edge of gravel.
All of the information created in those 4 drawings will get data referenced into the Pavt.dwg.
And then that data will be used as an Xref in the Plan Sheets drawing.
Tip: There are three designers on this project but even if there was a single designer it is best to still have three corridors. With a single designer you could place all you edgeline alignments in the AliProf and then data reference them into the pertinent corridor file.
- Tan-Tan (with curves) > click on the beginning of the curb
- Hover over the end of the tangent- a + sign appears
- Hover over the next tangent and a + sign appears
- Hover out where the PI is and the intersection will be marked by dashed lines > left click
- Click the end of the curb > Enter
- Use the grip at the PI to move the curb into place
- Repeat for the final curb