Make edgelines ready for plan production
Last updated: 2020-10-26
Total video time: 12:53
 Data reference edgeline alignments into Pavt.dwg
Exercise files: ali-mak-edglin-rdy-pln-prod-01-data-C3D16.zip
- 12345678 > Design Folder > Edgelines Folder > Open pavt.dwg file
- Prospector > Right-click on Data Shortcuts [] > Set Working Folder
- Open C3D file.
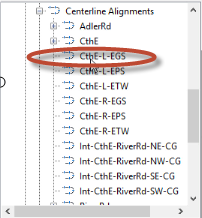
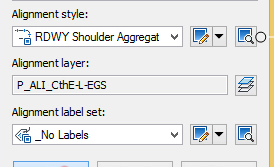
- Data Shortcuts > Alignments > Centerline Alignments > Right-click on CthE-L-EGS > Create Reference
- Alignment style = RDWY Shoulder Aggregate
- Label Set = _No Label
- OK
- Right-Click on CthE-R-EGS > Create Reference
- OK
- Right-Click on RiverRd-L-EGS > Create Reference
- OK
- Right-Click on RiverRd-R-EGS > Create Reference
- OK
- Right-Click on the CthE-L-EPS > Create Reference
- Alignment style = RDWY Shoulder Paved
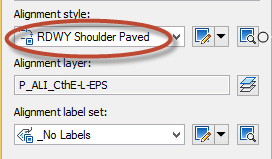
- OK
- Right-Click on the CthE-R-EPS > Create Reference
- OK
- Right-Click on the CthE-L-ETW > Create Reference
- Alignment style = RDWY Pavement Edge
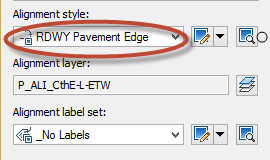
- OK
- Right-Click on the CthE-R-ETW > Create Reference
- OK
- Right-Click on the RiverRd-L-ETW > Create Reference
- OK
- Right-Click on the RiverRd-R-ETW > Create Reference
- OK
- Right-Click on the Int-CthE-RiverRd-NE-CG > Create Reference
- Alignment style = RDWY Curb&Gutter Flange
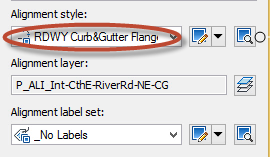
- OK
- Right-Click on the Int-CthE-RiverRd-NW-CG > Create Reference
- OK
- Right-Click on the Int-CthE-RiverRd-SE-CG > Create Reference
- OK
- Right-Click on the Int-CthE-RiverRd-SW-CG > Create Reference
- OK
Create offsets for back of curb edgelines
Exercise files: ali-mak-edglin-rdy-pln-prod-02-data-C3D16.zip
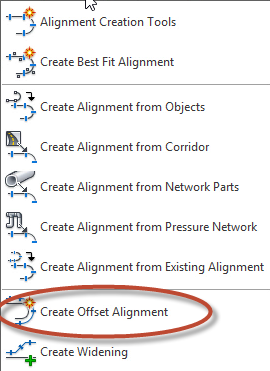
- Home Tab > Create Design > Alignment > Create Offset Alignment

- Select NW Curb and Gutter Flange.
- Un-Check From Start and To End
- Click select from Screen Icon for the start.

- Select the North End for the start.
- Click the select from screen button for the end.
- Snap to the end.
- Offsets on right = 1
- Incremental offset on right = 36"
- Alignment Style = RDWY Curb&Gutter Back
- Select the sheet icon in the Alignment layer.
- Modifier = None
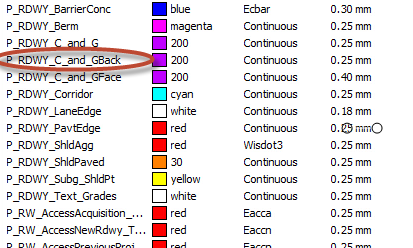
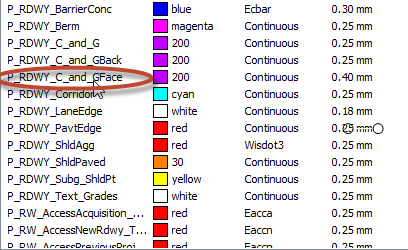
- Base Layer Name = P_RDWY_C_and_GBack
- Alignment label set = _No Labels
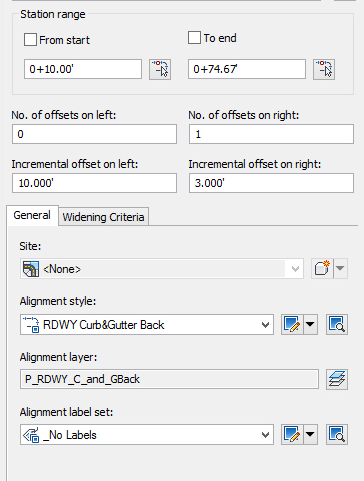
- OK
- Home Tab > Create Design > Alignment > Create Offset Alignment

- Select NE Curb and Gutter Flange.
- Un-Check From Start and To End
- Click select from Screen Icon for the start.
- Select the North End for the start.
- Click the select from screen button for the end.
- Snap to the end.
- Select the sheet icon in the Alignment layer.
- Modifier = None
- Base Layer Name = P_RDWY C_and_GBack

- OK
- Home Tab>Create Design>Alignment > Create Offset Alignment
- Select SW Curb and Gutter Flange.
- Un-Check From Start and To End
- Click select from Screen Icon for the start.

- Select the North End from the west end.
- Click the select from screen button for the end.
- Snap to the south end.
- Select the sheet icon in the Alignment layer
- Modifier = None
- Base Layer Name = P_RDWY_C_and_GBack

- OK
- Home Tab > Create Design > Alignment > Create Offset Alignment
- Select SE Curb and Gutter Flange.
- Un-Check From Start and To End
- Click select from Screen Icon for the start.

- Click the select from screen button for the end.
- Snap to the east end.
- Select the sheet icon in the Alignment layer.
- Modifier = None
- Base Layer Name = P_RDWY_C_and_GBack

- OK
Create offsets for face of curb edgelines
Exercise files: ali-mak-edglin-rdy-pln-prod-03-data-C3D16.zip
- Home Tab > Create Design > Alignment > Create Offset Alignment
- Select the NW back of curb.
- Check From Start and To End
- Offsets on left = 1
- Offsets on right = 0
- Incremental offset on left = 6"
- Alignment Style = RDWY Curb&Gutter Face
- Select the sheet icon in the Alignment layer.
- Modifier = None
- Base Layer Name = P_RDWY_C_and_GFace

- Alignment label set = _No Labels
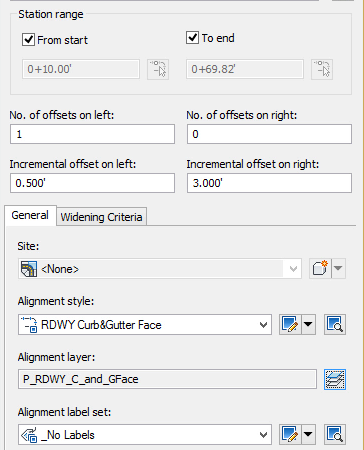
- OK
- Home Tab > Create Design > Alignment > Create Offset Alignment
- Select the NE back of curb.
- Select the sheet icon in the Alignment layer.
- Modifier = None
- Base Layer Name = P_RDWY_C_and_GFace
- OK
- Select the sheet icon in the Alignment layer.
- Home Tab>Create Design>Alignment > Create Offset Alignment
- Select the SW back of curb.
- Select the sheet icon in the Alignment layer.
- Modifier = None.
- Change the Base Layer Name to P_RDWY_C_and_GFace.

- OK
- Select the sheet icon in the Alignment layer.
- Home Tab > Create Design > Alignment > Create Offset Alignment
- Select the SW back of curb.
- Select the sheet icon in the Alignment layer.
- Change the modifier to None.
- Change the Base Layer Name to P_RDWY_C_and_GFace.

- OK
- Select the sheet icon in the Alignment layer.
- Save
Edit curb and gutter offset edgelines
Exercise files: ali-mak-edglin-rdy-pln-prod-04-data-C3D16.zip
- Left-Click on the back of curb.
- Select the diamond that appears on the parent flange of curb
- Adjust the length of the parent alignment.