AutoCAD modify
Last updated: 2026-01-06
Total video time: 44:42
Modify commands are used to make changes to objects that have already been drawn. These commands can greatly improve workflow efficiency by eliminating the need to re-create objects, streamlining object creation and location specification, combining multiple commands, and otherwise utilize existing geometry objects.

 Move & Copy
Move
The Move command allows you to relocate objects either by keying in X, Y, Z displacement or by cursor-selecting a base point and destination point.
- Open acad-modify-begin.dwg
-
Ribbon > Home tab > Modify panel > Move
Info: m is a command line "alias" that also invokes the move command.
-
Select objects: SD.D.11.A 1-3 text in lower right of drawing extents
-
spacebar
-
Specify base point: lower right Endpoint of sheet border Line
-
Specify second point: pick anywhere to place new base point location
-
Ctrl+z to undo previous command.
-
- sRibbon > Home tab > Modify panel > Move
- Select objects: SD.D.11.A 1-3 text in lower right of drawing extents
- Displacement
- Enter
- -50,0,0
- enter
- Ctrl+z to undo previous command.
Copy
The Copy command allows you to duplicate an existing object and then paste it to a location either by keying in X, Y, Z displacement or by cursor-selecting a base point and destination point.
- Continue working in acad-modify-begin.dwg
-
Ribbon > Home tab > Modify panel > Copy
Info: co is a command line "alias" that also invokes the copy command.
-
Select objects: SD.D.11.A 1-3 text in lower right of drawing extents
-
Right-click or spacebar
-
-
Specify second point: lower left Endpoint of sheet border Line
-
Left-click multiple additional destination points
-
Select copies made in above step and delete
-
- Ribbon > Home tab > Modify panel > Copy
- Select objects: SD.D.11.A 1-3 text in lower right of drawing extents
- Right-click or spacebar
- Displacement
- enter
- -50,0,0
- enter
- Ctrl+z to undo previous command.
- Select objects: SD.D.11.A 1-3 text in lower right of drawing extents
- Ribbon > Home tab > Modify panel > Copy
- Select text to copy
- Right-click or spacebar
- Mode
- Multiple (allows multiple copies of selected objects)
- spacebar to end command
- Select text to copy
 Rotate & Scale
Continue with acad-modify-begin.dwg
acad-modify-02.mp4 5:27
Rotate
The Rotate command allows you to rotate an object in the XY plane about a point either by keying in a rotation angle, selecting a relative rotation point, or picking two points to form a reference "line" and two points to form a destination rotation "line".
- Continue working in acad-modify-begin.dwg
- Select SD.D.11.A 1-3 text in lower middle of drawing extents
- Select the square grip on the text
- Place the grip at the lower left corner of the sheet border to move the text
-
Ribbon > Home tab > Modify panel > Rotate (roEnter for command line hotkey option)
Info: ro is a command line "alias" that also invokes the rotate command.
-
Specify base point: lower left corner of the sheet border
-
Specify rotation angle: 180 enter
-
- Ribbon > Home tab > Modify panel > Rotate
- Select SD.D.11.A 1-3 text
- Right-click or spacebar
- Specify base point: lower left corner of the sheet border
- Reference
Left-click first and second reference angle points
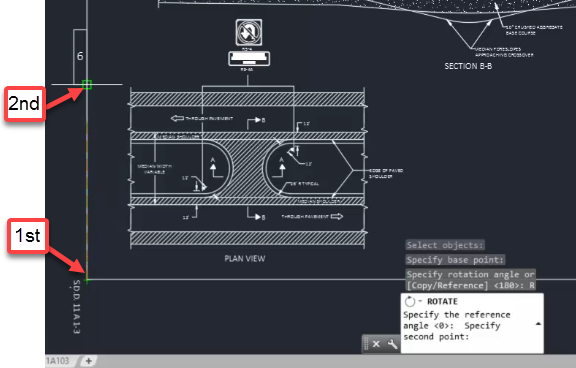
Specify the new angle: p
enter
Left-click first and second new angle points
- Select SD.D.11.A 1-3 text
Scale
The Scale command allows you to resize a selection of objects while holding a specified base point either by keying in a scale factor or referencing existing objects.
- Continue working in acad-modify-begin.dwg
- Double-click middle mouse wheel to Zoom Extents
- Window-Select full-sized "PLAN VIEW"
- delete
-
Ribbon > Home tab > Modify panel > Scale
Info: sc is a command line "alias" that also invokes the scale command.
-
Select objects: Window-Select half-size objects to left of full-size objects
-
Specify base point: lower right of half-size border Line
-
Specify scale factor: 2 enter
-
Ctrl+z to undo last command
-
- SC enter
- Window-Select half-sized objects to left of full-size objects
- Specify base point: lower right of half-size border Line
- R enter for Reference
- Specify reference length: Left-click beginning and end of bottom half-size border Line
- Specify new length: P enter
- Left-click beginning and end of bottom full-sized border Line
- Window Select "PLAN VIEW" objects that were Scaled up
- m enter
- Specify base point: lower left of bottom border Line that was Scaled up
- Specify second point: lower left of original full-size bottom border Line
- Select redundant border Lines
- delete
- Double-click middle mouse wheel to Zoom Extents
 Join & Explode
Start with acad-modify-01.dwg
acad-modify-03.mp4 5:23
Join
The Join command will take all Line and/or Arcs objects included in a selection set that share common start and end point coordinates (same X,Y,Z) and combine them into a single Polyline.
-
Open acad-modify-01.dwg
-
Pan and zoom to PLAN VIEW detail
-
Ribbon > Home tab > Modify panel flyout > Join
Info: j is a command line "alias" that also invokes the join command.
-
Select Lines and Arc representing median back of curb
-
spacebar
-
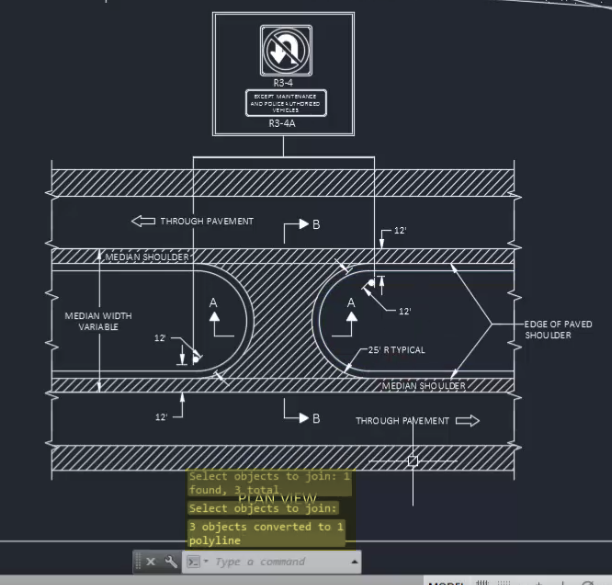
- Repeat above step on the other side.
- Ribbon > Home tab > Modify panel flyout > Join
- Select all "breakline symbol" Polylines along right side of PLAN VIEW detail
- enter
- Observe "0 objects joined, 6 objects discarded..." on command line history
- Select "breakline symbol" Polyline near bottom right of PLAN VIEW detail
- Left-click vertex grip
- Use Endpoint Object Snap to set vertex at same location as adjacent Polyline vertex
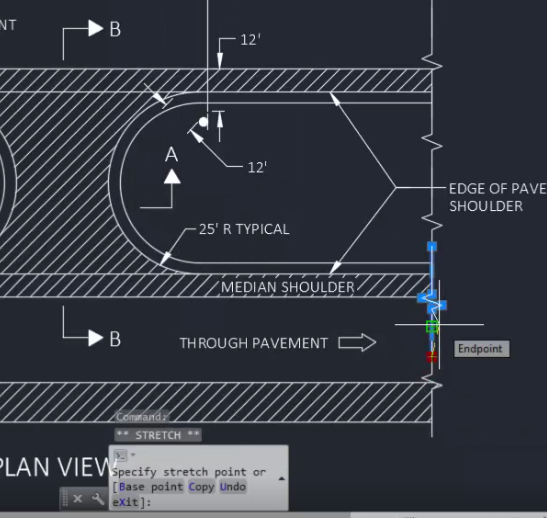
- esc
- Ribbon > Home tab > Modify panel flyout > Join
- Select two Polylines whose vertices were aligned in previous step.
- enter
- Observe "5 segments joined into 1 polyline" on command line history
- Ribbon > Home tab > Modify panel flyout > Join
- Select all 4 sides of sheet border.
- enter
-
Observe "3 objects converted to 1 polyline, 1 objects discarded..." on command line history
-
In the Properties palette, observe that the left sheet border line has a different elevation at its vertices than the polyline created with the previous join command.
-
Set the Z axis on the left line to 0.
Info: All linework must be have the same elevation (Z) value in order for the join command to work.
-
- Ribbon > Home tab > Modify panel flyout > Join
- Select all sheet border linework.
- enter
- Observe that the border is 1 polyline.
Explode
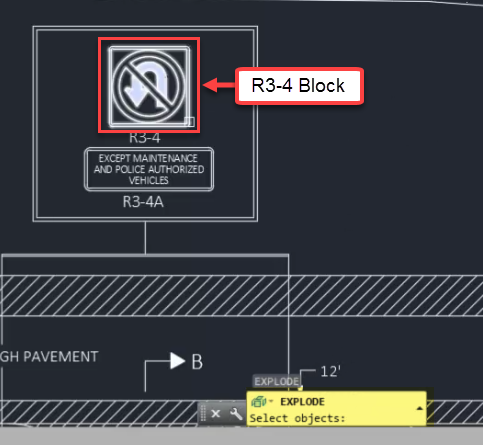
The Explode command will break objects down into foundational pieces. For example, a single Polyline can be Exploded into multiple Lines and/or Arcs that make up the Polyline geometry.
Warning: Never Explode a Civil 3D Object (i.e. Alignment, Surface, Corridor). This will cause you to lose dynamic updating, labeling, data referencing and other powerful object functionality. Thus, the Explode command should be limited to simple AutoCAD objects as demonstrated in this section.
-
Continue working in acad-modify-01.dwg
-
Ribbon > Home tab > Modify panel > Explode
Info: x is a command line "alias" that also invokes the explode command.
-
Select PLAN VIEW median Polyline previously Joined
-
enter
-
-
Zoom and pan to R3-4 signage detail
-
x enter
-
Select R3-4 Block
-
enter
-
-
x enter
-
Select outermost Polyline resulting from the Exploded R3-4 Block
-
enter
-
 Erase & Stretch
Continue with acad-modify-01.dwg
acad-modify-04.mp4 3:02
Erase
The Erase command allows you to remove a selection set of objects from a drawing. You can either invoke the command and then select objects to remove using your selection method of choice or vice-versa.
Tip: It is a good idea to hit esc a couple times before selecting objects to erase. This will ensure that you do not have objects selected that you do not intend to erase. Selected objects are not always visible depending your current Zoom level and Pan location. Your Properties Palette is a good place to check on what is included in the current selection set.
-
Continue working in acad-modify-01.dwg
-
Ribbon > Home tab > Modify panel > Erase
Info: e is a command line "alias" that also invokes the erase command.
-
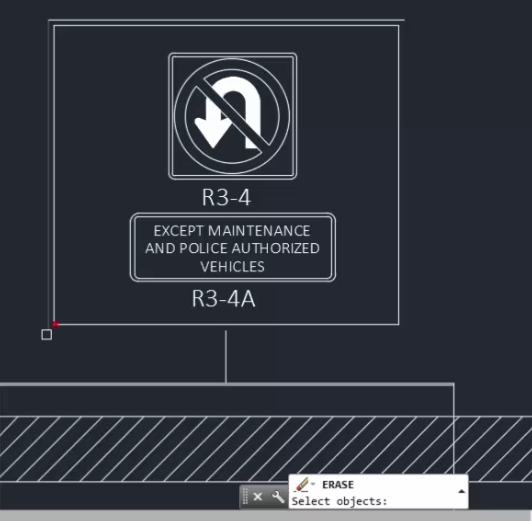
Select outermost Lines surrounding the R3-4 and R3-4A details
-
enter
-
Stretch
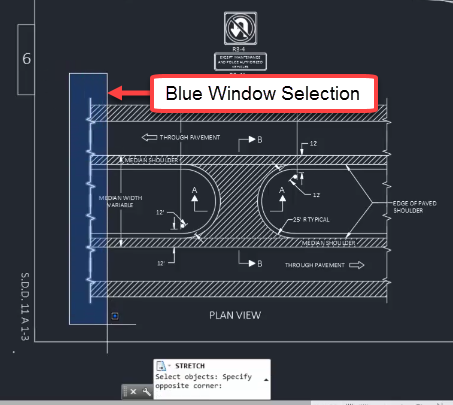
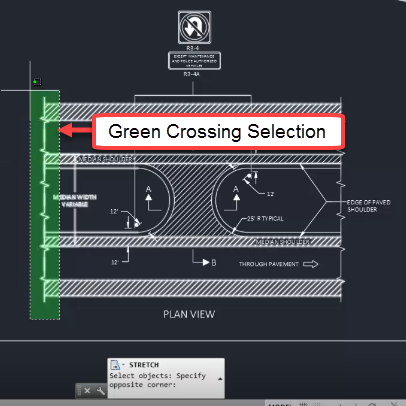
The Stretch command allows you to move objects and simultaneously lengthen and reorient adjacent objects while maintaining the original attachment location. After invoking the Stretch command, any objects completely enclosed in a Crossing selection will be moved and any objects partially enclosed in the same Crossing selection will be lengthened and reoriented.
-
Continue working in acad-modify-01.dwg
-
Ribbon > Home tab > Modify panel > Stretch
Info: str is a command line "alias" that also invokes the stretch command.
-
Use a Window Selection to select all "breakline symbol" Polylines on the left side of the PLAN VIEW detail
-
enter
-
Right-click to finish selection
-
Left-click to specify base point
-
Move Cursor and Left-click to specify second point
-
Observe move-only behavior
-
-
-
Ctrl+z to undo last command.
-
Ribbon > Home tab > Modify panel > Stretch
-
Use a Crossing Selection to select all "breakline symbol" Polylines on the left side of the PLAN VIEW detail
-
enter
-
Right-click to finish selection
-
Left-click to specify base point
-
Move Cursor and Left-click to specify second point
-
Observe intended Stretch behavior
-
-
 Mirror & Offset
Start with acad-modify-02.dwg
acad-modify-05.mp4 5:52
Mirror
The Mirror command allows you to essentially copy, rotate, and paste an object in the X-Y plane about a mirror line you specify. You can then choose to keep or remove the original object you have mirrored. This can greatly reduce your task time whenever you are creating object with an axis of symmetry in the X-Y plane.
-
Open acad-modify-02.dwg
-
Zoom and Pan to PLAN VIEW detail area of drawing
-
Ribbon > Home tab > Modify panel > Mirror
Info: mi is a command line "alias" that also invokes the mirror command.
-
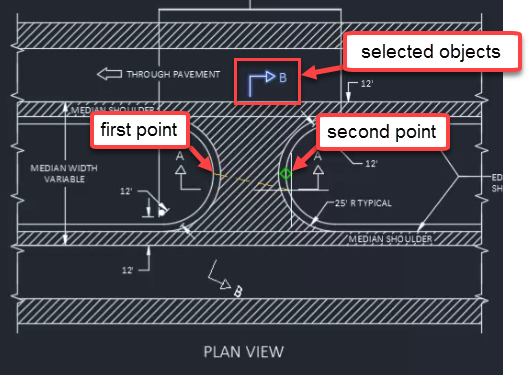
Select "section line arrow" and "B" Text in upper pavement area of PLAN VIEW detail
-
Right-click
-
Turn on Quadrant Osnap
-
Use Quadrant Osnap to specify first point of mirror line at quadrant point on median Arc
-
Use Quadrant Osnap to specify second point of mirror line at center of opposite median Arc
-
Erase source objects: N
-
enter
-
-
-
mi enter
-
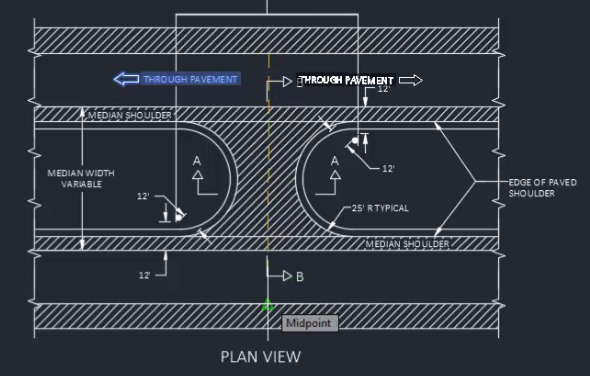
Select "THROUGH PAVEMENT" Text and adjacent "arrow symbol"
-
Right-click
-
Turn on Midpoint Osnap
-
Use Midpoint Osnap to specify first point of mirror line at upper midpoint of edge-of-pavement Line
-
Use Midpoint Osnap to specify second point of mirror line at lower midpoint of edge-of-pavement Line
-
Erase source objects: N
-
enter
-
-
-
Select newly created "THROUGH PAVEMENT" Text and adjacent "arrow symbol"
-
m enter
-
Specify base point and second point to move objects to lower pavement area of PLAN VIEW detail
-
Offset
The Offset command allows you to create an object in reference to existing Polyline, Line or Arc objects. The geometry of the newly created objects is dictated by a constant distance measured perpendicularly from the source object. You can call out the offset distance using a known numeric value or by specifying an offset location using your cursor. This tool is especially helpful when laying out proposed roadway or parcel linework (i.e. Edge of Pavement, ROW)
Tip: Using modify commands such as Offset to manipulate Polylines is a great way to lay the foundation for dynamic Civil 3D Objects. This is because many dynamic Civil 3D Objects (i.e. Alignment, Feature Line) can be initially created from simpler AutoCAD Objects (i.e. Polyline).
- Continue working with acad-modify-02.dwg
- Zoom and Pan to SECTION A-A detail area of drawing
-
Ribbon > Home tab > Modify panel > Offset button
Info: of is a command line "alias" that also invokes the offset command.
-
Specify offset distance: 1.5
-
enter
-
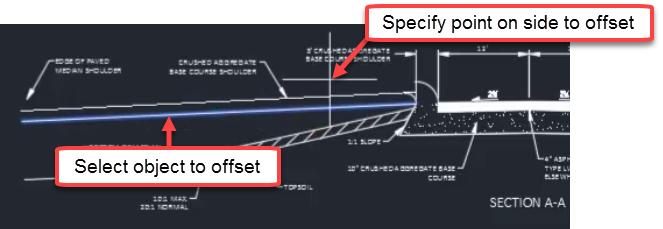
Select object to offset: select subgrade Line on left side of SECTION A-A detail
-
Specify point on side to offset: left-click above subgrade Line
-
enter or esc to end command.
-
- Of enter
- Specify offset distance: Through
- Turn on Endpoint Osnap
- Specify through point: Endpoint of median nose Arc

- Select object to offset: select "CRUSHED AGGREATED BASE COURSE SHOULDER" Line on right side of SECTION A-A detail
- Specify through point: Endpoint of median nose Arc on right side of SECTION A-A detail
- of enter
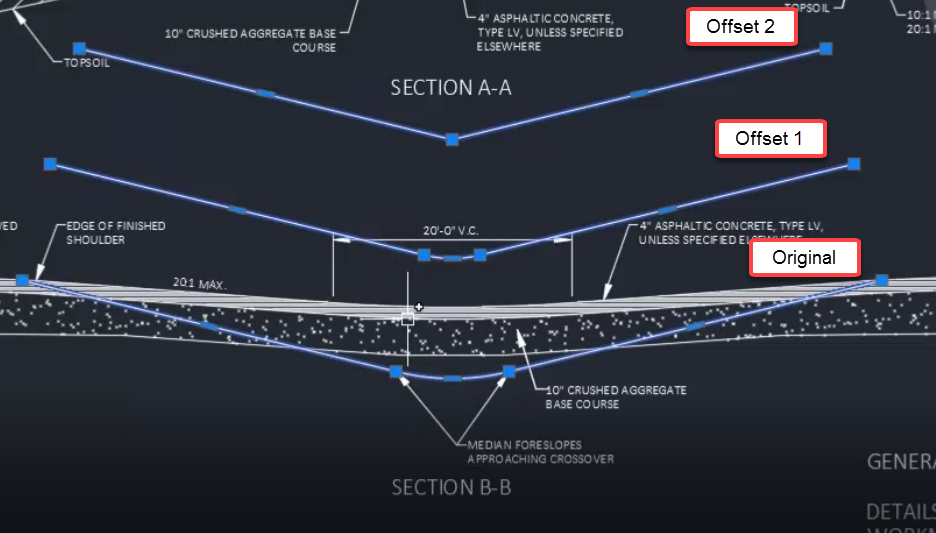
- select object to offset: MEDIAN FORESLOPES Polyline in SECTION B-B detail
- Specify offset distance: 10
- enter
- specify point on side to offset: above selected Polyline
- Repeat above steps selecting previously offset Polyline as object to offset
- Observe disappearance of Arc segment on offset Polyline
 Trim, Extend & Lengthen
Continue with acad-modify-02.dwg
acad-modify-06.mp4 5:36
Trim
The Trim command allows you to modify existing geometry such that a section is removed based on intersection with other referenced existing geometry. For example, a Line can be shortened to the point at which it intersects with another Line. The Trim command applies to objects such as Line, Polyline, Circle, Ellipse, and Arc.
- Continue working with acad-modify-02.dwg
- Zoom and Pan to SECTION A-A detail area of drawing
-
Ribbon > Home tab > Modify panel > Trim
Info: tr is a command line "alias" that also invokes the trim command.
-
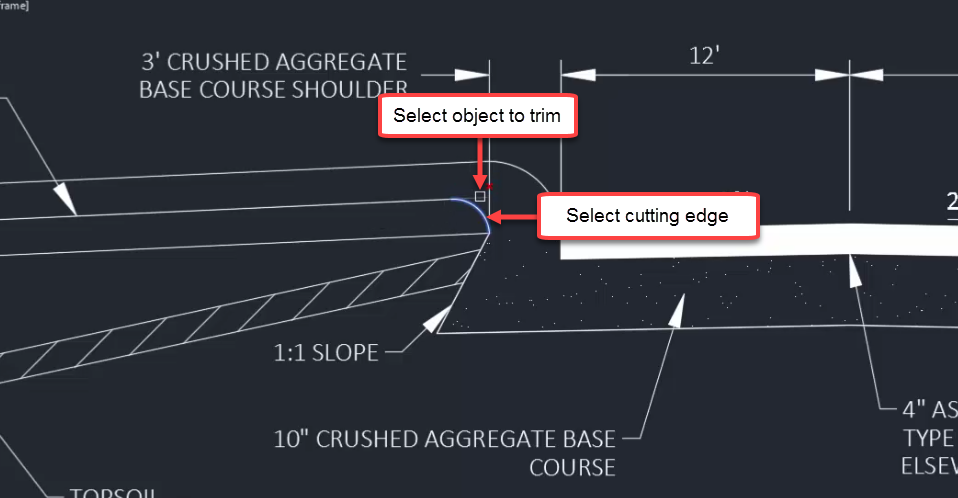
Select Objects: select smaller Arc intersecting with Line representing AGGREGATE SHOULDER
-
spacebar
-
Trim: select segment of Line you wish to trim
-
enter or esc to end command.
-
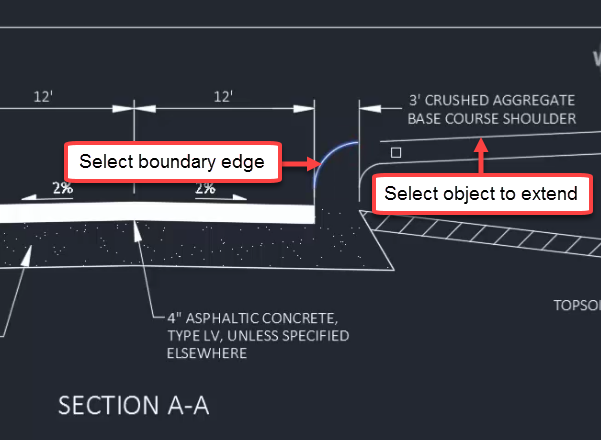
Extend
The Extend command is essentially the reverse of the Trim command. Extend allows you to lengthen a geometry object (i.e. Line, Polyline, Arc) up to the point where it would intersect referenced existing geometry.
- Continue working with acad-modify-02.dwg
-
Ribbon > Home tab > Modify panel > Extend
Info: ex is a command line "alias" that also invokes the extend command.
-
Select Objects: select median nose Arc on right side of SECTION A-A detail
-
spacebar
-
Extend: select Line you wish to extend
-
enter or esc to end command.
-
Hold shift while the Trim command is active in order to switch to the Extend command on the fly.
While selecting objects to Extend or Trim, choose the mid-command option <select all>. This allows you to use any existing geometry object as a potential Extend boundary or Trim cutting edge.
Lengthen
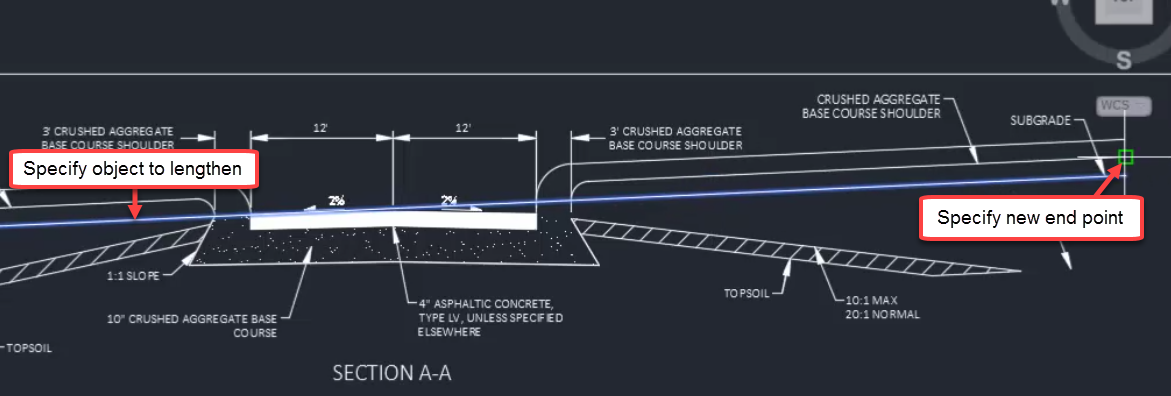
The Lengthen command allows you to continue an object along it's current direction without the need for existing geometry to serve as a boundary to extend to. You can use Object Snaps to specify the amount you wish to lengthen the object. The Lengthen command also includes mid-command options to measure selected object geometry.
- Continue working with acad-modify-02.dwg
- Ribbon > Home tab > Modify flyout > Lengthen
Info: len is a command line "alias" that also invokes the length command.
- Select an object to measure or: DY
- enter
- Select an object to change: select Line on left side of SECTION A-A representing SUBGRADE
- specify new end point: use Endpoint Osnap to select the end of the Line representing CRUSHED AGGREGATE BASE COURSE SHOULDER on the right side of SECTION A-A detail
- enter
- tr enter
- Trim the middle of the lengthened line using the 2 should arcs.
- Select an object to measure or: DY
 Fillet & Break
Start with acad-modify-03.dwg
acad-modify-07.mp4 6:14
Fillet
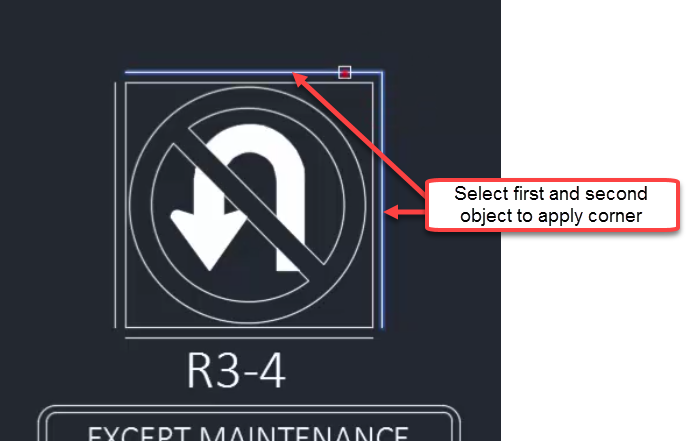
The Fillet command allows you to insert an Arc at the intersection (or apparent intersection) of two Lines (or Polylines) and trim the Lines at the points of tangency of the Arc. Fillet mid-command options allow you to specify Radius, apply Fillets to all line segment intersections on a Polyline, or continue the command and apply it multiple times consecutively.
- Open acad-modify-03.dwg
- Zoom and Pan to R3-4 sign above PLAN VIEW detail
-
Ribbon > Home tab > Modify panel > Fillet
Info: f is a command line "alias" that also invokes the fillet command.
-
Select first object or: R
-
enter
-
-
specify fillet radius: 0
-
enter
-
-
Select first object: select one of the outermost R3-4 detail Lines
-
Select second object to apply corner: select adjacent R3-4 detail Line
-
- f enter
- Select first object or: R
- enter
- specify fillet radius: 0.35
- enter
- Select first object: select one of the outermost R3-4 detail Lines
- Select second object to apply corner: select adjacent R3-4 detail Line
- Select first object or: R
- f enter
- Select first object or: Multiple
- enter
- Apply Fillets to all remaining outermost R3-4 detail Lines
- enter
- Select first object or: Multiple
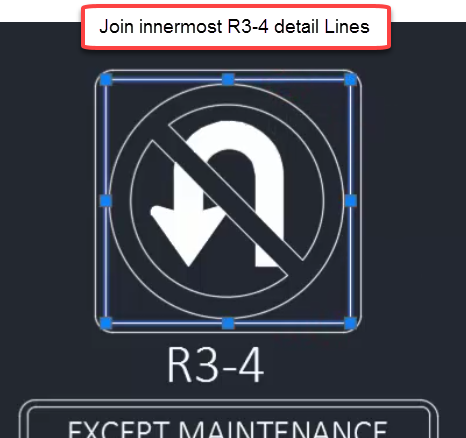
- Select all four innermost Lines on R3-4 detail
- j enter
- f enter
- Select first object or: R
- enter
- specify fillet radius: 0.2
- enter
- Select first object or: polyline
- enter
- Select 2d polyline: select Polyline formed in Step 6.A
- j enter
Tip: Use the Fillet command with radius=0 to extend line segments to their point of apparent intersection. The arc segment will then be omitted.
Break
The Break command allows you to create two Lines or Polylines from a single existing Line. You have the option to Break the Line at a single point so that the two resulting Lines share a common endpoint location or to Break the Line at two points so that a gap is formed between the two resulting Lines.
- Continue working with acad-modify-03.dwg
- Zoom and Pan to PLAN VIEW detail area of drawing
- Ribbon > Home tab > Modify flyout > Break
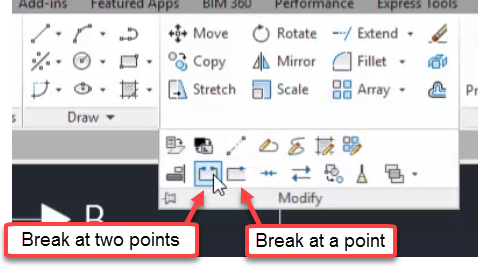
Info: br is a command line "alias" that also invokes the break command.
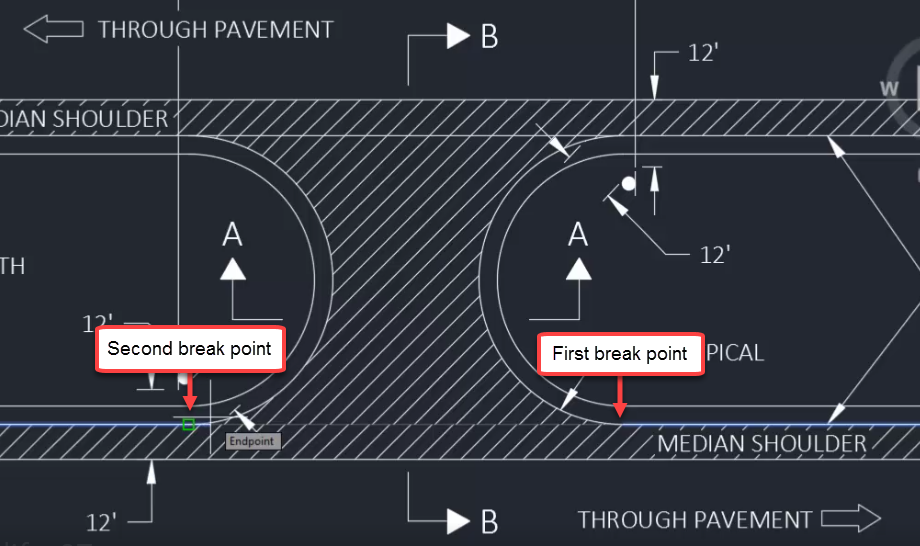
- Select object: select Line bounding MEDIAN SHOULDER on bottom side of PLAN VIEW detail tangent to median Arc
- Specify second break point or: first point
- Specify first break point: Use Endpoint Osnap to select intersection of median Arc and Line
- Specify second break point or: Use Endpoint Osnap to select intersection of median Arc and Line on opposite side of median crossover detail
-
Ribbon > Home tab > Modify flyout > Break at Point
-
Select object: select Line bounding MEDIAN SHOULDER on top side of PLAN VIEW detail tangent to median Arc
-
Specify second break point: Use Endpoint Osnap to select intersection of median Arc and Line
-
-
Repeat the previous step on the opposite side of median crossover detail.
-
Select and delete the middle line that was created from the previous 2 steps.
 Array
Array
Continue with acad-modify-04.dwg
acad-modify-08.mp4 4:36
The Array command allows you to copy a selected object and paste the object repetitively in a Rectangular, Polar, or Path based Array. A Rectangular Array is arranges the copied object in rows and columns. A Polar Array arranges the copied object at a radius and incremental angle about a specified location. A Path Array arranges the copied object at a specified location along a path based on an existing Line or Polyline. This section will cover the Rectangular Array.
- Open acad-modify-04.dwg
- Zoom and Pan to PLAN VIEW detail area of drawing
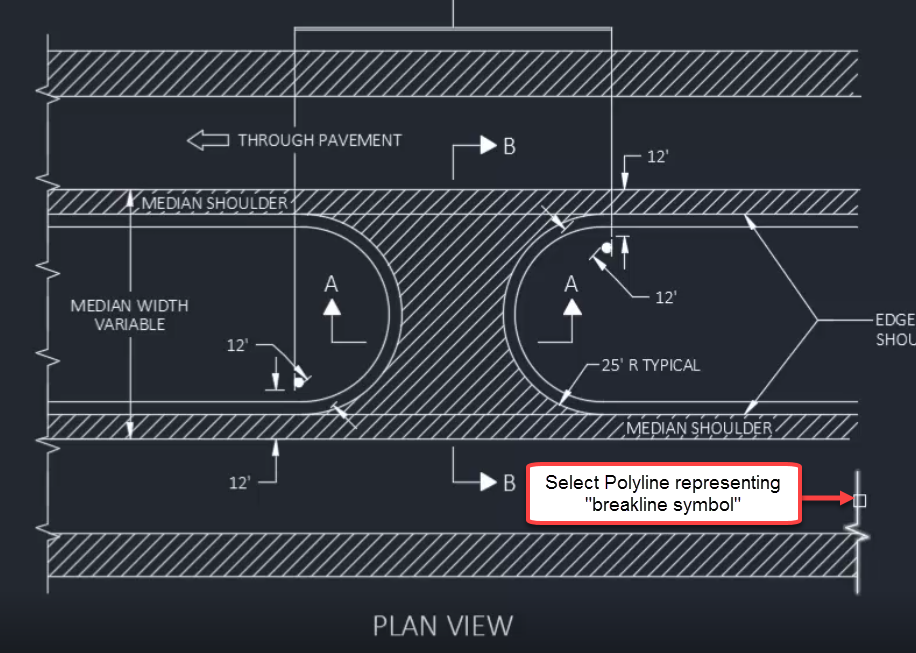
- Select Polyline representing "breakline symbol"
-
Ribbon > Home tab > Modify panel > Array (Rectangular)
Info: ar is a command line "alias" that also invokes the array command.
-
Ribbon > Array contextual tab > Columns panel
-
Columns = 1
-
-
Ribbon > Array contextual tab > Rows panel
-
Rows =6
-
-
Select grip to edit array or: Spacing
-
enter
-
-
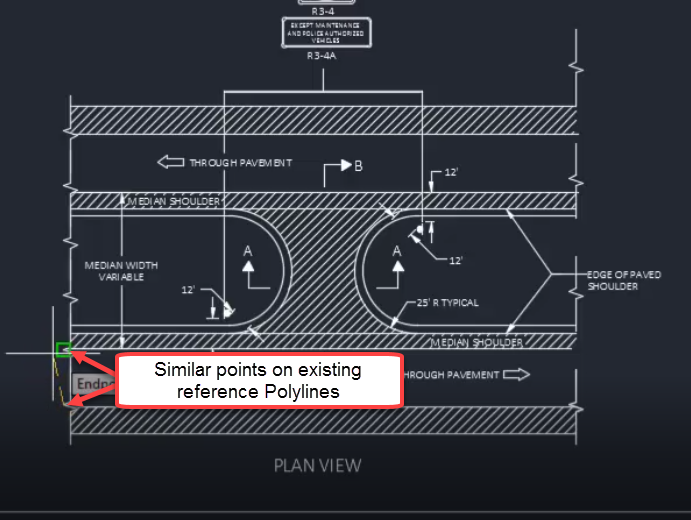
Specify distance between rows: Use Endpoint Osnap to select two similar points on "breakline symbol" Polylines on left side of PLAN VIEW
-
enter
-
enter or esc to end command.
-
-
 Reverse & Align
Continue with acad-modify-04.dwg
acad-modify-09.mp4 3:38
Reverse
The Reverse command will change the order of Polyline vertices. This is helpful when you wish to add a vertex to the end of an existing Polyline. By default, Civil 3D will add the vertex in front of the highest numbered vertex (the last vertex placed). If you want to add a vertex to the end of the lowest numbered vertex (vertex 1), it will instead be placed between vertex 1 and 2. The order of Polyline and Line vertices also affects how a Linetype is generated. Linetypes will start at vertex 1.
- Continue working with acad-modify-04.dwg
- Open Properties Palette
- props
- enter
- props
- Select Polyline drawn along bottom of 10" CRUSHED AGGREGATE BASE COURSE Hatch
- Properties palette > Geometry dropdown > Current Vertex
- Toggle between numbered vertices
- Observe glyph showing vertex location in drawing area
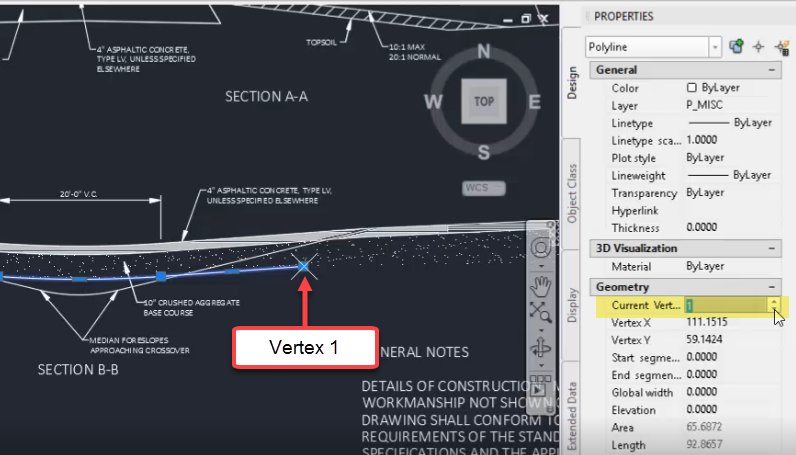
- Hover cursor over vertex 1
- Add vertex
- Observe default placement of new vertex
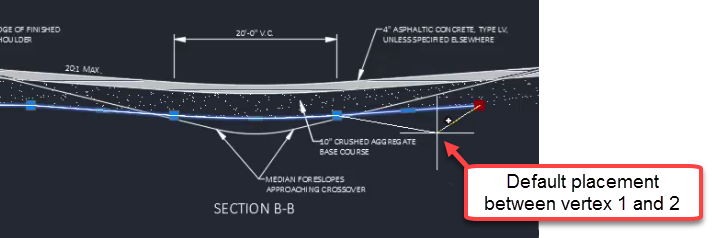
- Ribbon > Home tab > Modify flyout > Reverse
- Properties palette > Geometry dropdown > Current Vertex
- Observe reversed order of Polyline vertices
- Hover cursor over vertex 5
- Add vertex
- Observe default placement of new vertex
- Use desired Osnap to place new vertex
Align
The Align command combines the functionality of the Move, Rotate, and Scale commands. Most basic AutoCAD objects can be affected by the Align command (i.e. Polyline, Block, Hatch, Text). Once the command is activated, you will select objects to Align then select at least two source and destination points. If any rotation, repositioning, or scaling is necessary to replace the source points with destination points, the Align tool will do this for you.
- Continue working with acad-modify-04.dwg
- Zoom and Pan to area including SECTION A-A detail and misaligned objects above sheet border Line
-
Ribbon > Home tab > Modify flyout > Align
Info: al is a command line "alias" that also invokes the align command.
-
Select objects: select misaligned objects above sheet border Line
-
Right-click
-
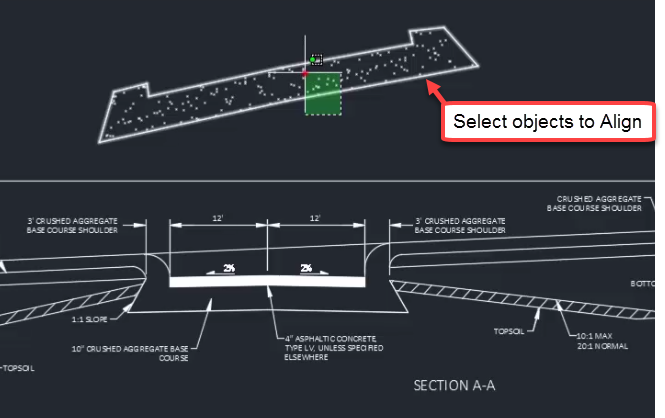
-
Specify first source point: use Endpoint Osnap to select lower left Polyline vertex
-
Specify first destination point: use Endpoint Osnap to select analogous destination point on SECTION A-A detail
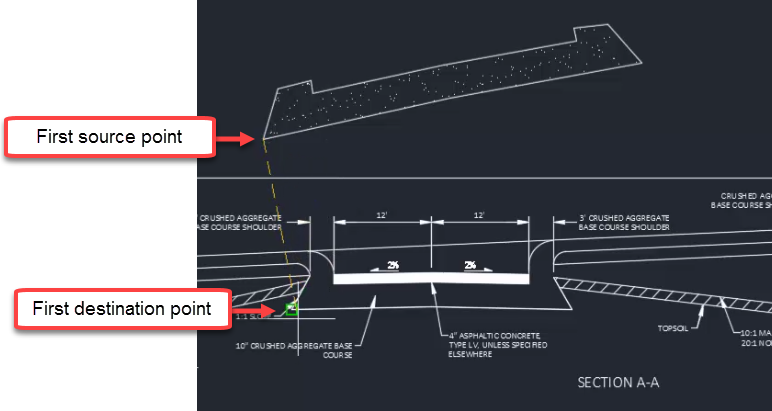
-
Specify second source point: use Endpoint Osnap to select lower right Polyline vertex
-
Specify second destination point: use Endpoint Osnap to select analogous destination point on SECTION A-A detail
-
specify third source point or <continue>:
-
spacebar
-
-
Scale objects base on alignment point?: y
-
enter
-
-